
YuboxNow: equip your ESP32 board with its own LoRaWAN configuration and support Web interface
Embed a configuration web interface on your ESP32 just like a router, with built-in WiFi and LoRaWAN support for your next open-source IoT project.
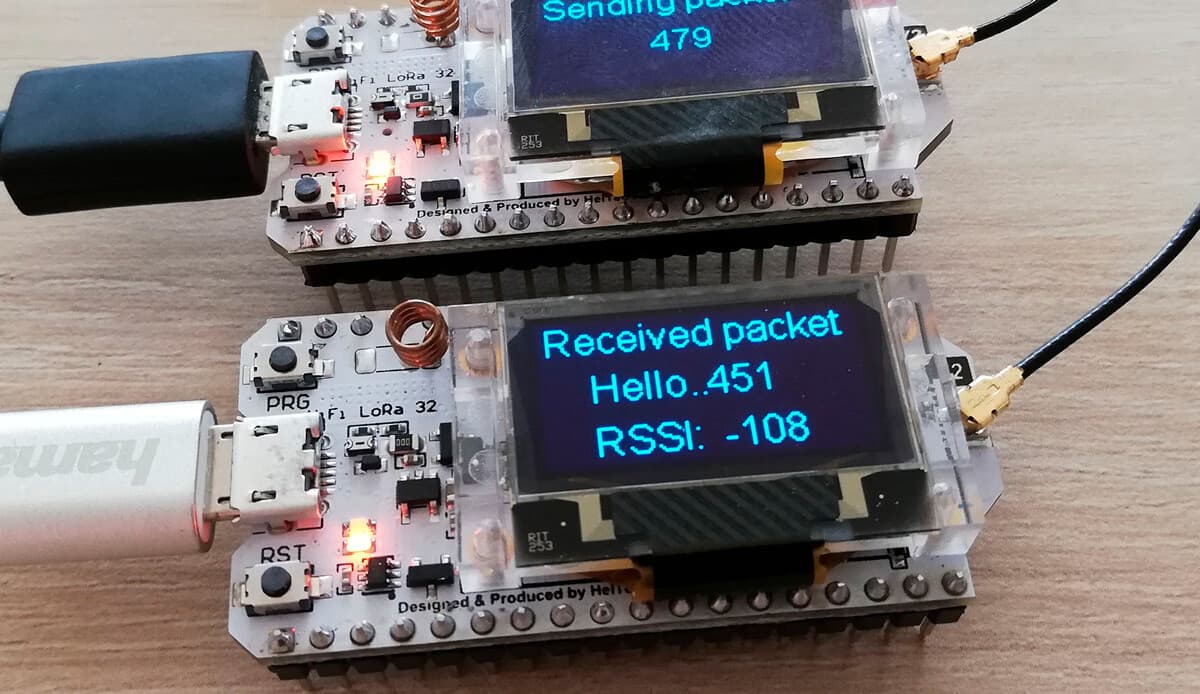
In the same way that you can configure a wireless router, YuboxNow allows you to embed a configuration interface on your ESP32 electronic board. YuboxNow is under free license and a very interesting feature is that it supports chipsets with LoRaWAN, which is very fashionable in the world of Internet of Things or IoT.
ESP32 boards supported?
Theoretically any ESP32 card. The ones that I can confirm personally are:
- Heltec WiFi LoRa
- HiLetgo ESP-WROOM-32 (without LoRaWAN)
- Yubox Node
- Yubox ONE
Here I will do a short tutorial on how to install YuboxNow on the Heltec WiFi LoRa card, because it is very easy to get it. I leave link to Amazon.
More information about the Heltec WiFi LoRa board on its official website https://heltec.org/project/wifi-lora-32/
Requirements
- A supported ESP32 board
- Arduino IDE, at least version 1.8.13
- ESP32 support for the Arduino IDE (Arduino-ESP32), version 2.0.3 or higher (this is done in the Arduino boards manager)
- YUBOX Now Libraries and Dependencies Updated
Step 1) Install Arduino Plugins
The YUBOXNow sketch can be compiled from the Arduino IDE, as is done with other projects. You must select the “Heltec WiFi LoRa 32 (V2)” board from the boards manager. We must also keep in mind that we will need to have the following Arduino PLUGINS previously installed. Do not confuse plugins with libraries.
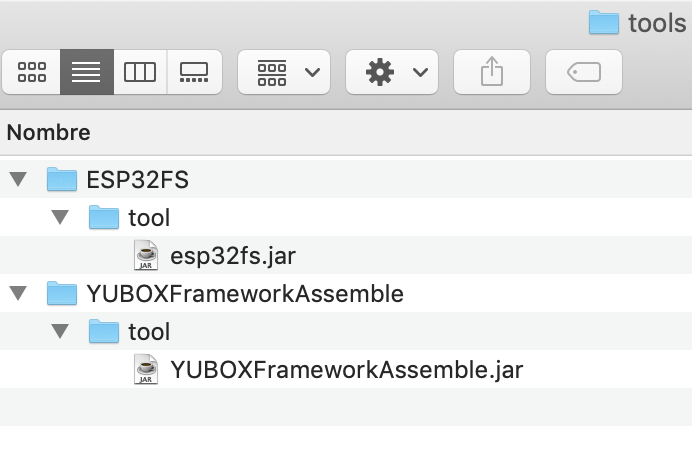
- YUBOX - Assemble HTML Interface: create the data / directory and gather the YUBOXNow modules into the HTML and Javascript files for the initial SPIFFS. It is a library that can be downloaded from this link, in ZIP format and it is installed inside the “tools” directory located in the Arduino base folder.
- ESP32 Sketch Data Upload: generates and uploads the initial YUBOXNow SPIFFS file system to the board. It can be installed from the ArduinoIDE library manager or you can follow the instructions here: https://github.com/me-no-dev/arduino-esp32fs-plugin
After installing these plugins the tools folder should look similar to the following image.
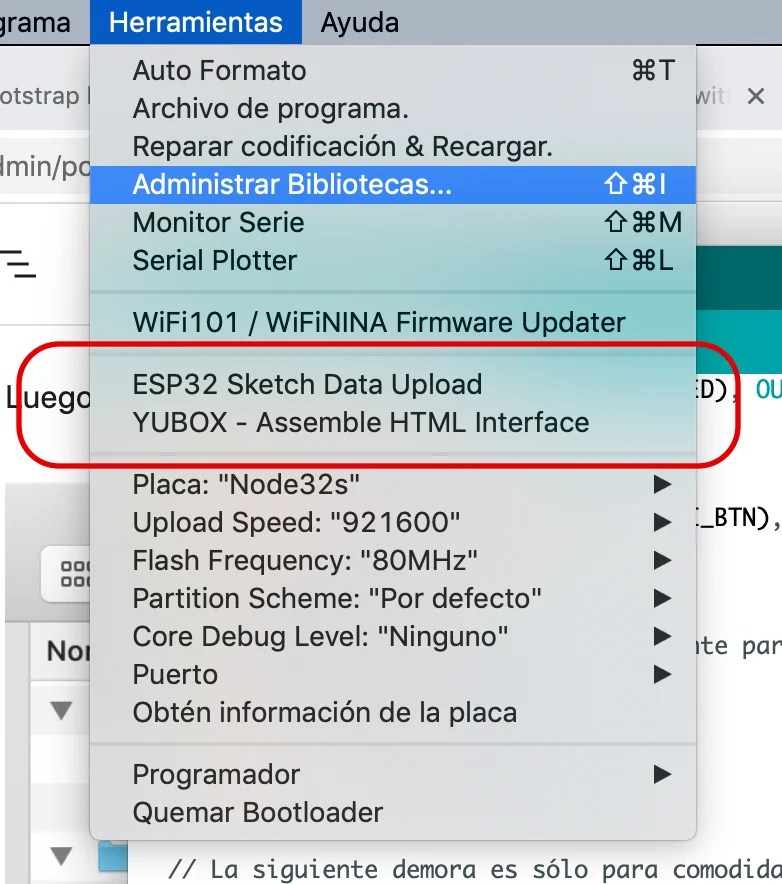
After this we restart Arduino and we should see these two new options in the Tools menu.
Step 2) Install YuboxNow
The YuboxNow project is hosted on GitHub at the following link. We can use the GIT tool to clone the project, or if that sounds complicated, we can also download it directly from here in zip format.
This file contains a folder called yubox-now-master. We place this folder inside the directory "librariesWhere all the other Arduino libraries are installed.
| Operating system | Arduino libraries path |
|---|---|
| Mac OS X | / Users /USERNAME/ Documents / Arduino / libraries |
| Windows | C: \ Users \USERNAME\ Documents \ Arduino \ libraries |
| Linux | /home/USERNAME/ arduino / sketchbook / libraries |
If we have problems with the route, we can go to the Preferences menu, inside the Arduino IDE and there is the exact route.
YuboxNow has its own dependencies, among which we mention the following libraries:
| Library | Installation method |
| ArduinoJSON | From the Arduino library manager |
| AsyncTCPSock | From https://github.com/yubox-node-org/AsyncTCPSock/archive/master.zip |
| ESPAsyncWebServer | From https://github.com/yubox-node-org/ESPAsyncWebServer/archive/refs/heads/yuboxfixes-0xFEEDC0DE64-cleanup.zip |
| Async MQTT client for ESP8266 and ESP32 | From https://github.com/marvinroger/async-mqtt-client/archive/master.zip |
Detailed information on how to install these libraries can be found here: https://github.com/yubox-node-org/yubox-now/
Once the dependencies and the YuboxNow library are installed, we open one of the examples that come with YuboxNow, from the “File –> Examples –> YuboxNow –> ybx-blinktest” menu.
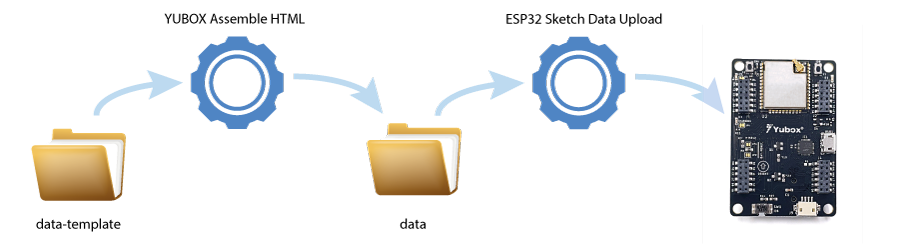
The first thing we will do before compiling is run the previously installed plugins in order to upload the Web directory to the board. First we run the Yubox Assemble HTML Interface and then the ESP32 Sketch Data Upload.
3) LoRaWAN Arduino Support
We can use YuboxNow without LoRaWAN support, but here we will show how to add this support (and its corresponding menu), since it is often somewhat cumbersome to configure LoRaWAN from the code. With YuboxNow it is much simpler, because it is done through a Web interface. To add LoRaWAN support, you need to install the following additional libraries in the Arduino IDE:
- SX126x-Arduino, the base library for communication with Semtech's SX126x chips. It can be installed from the Arduino library manager.
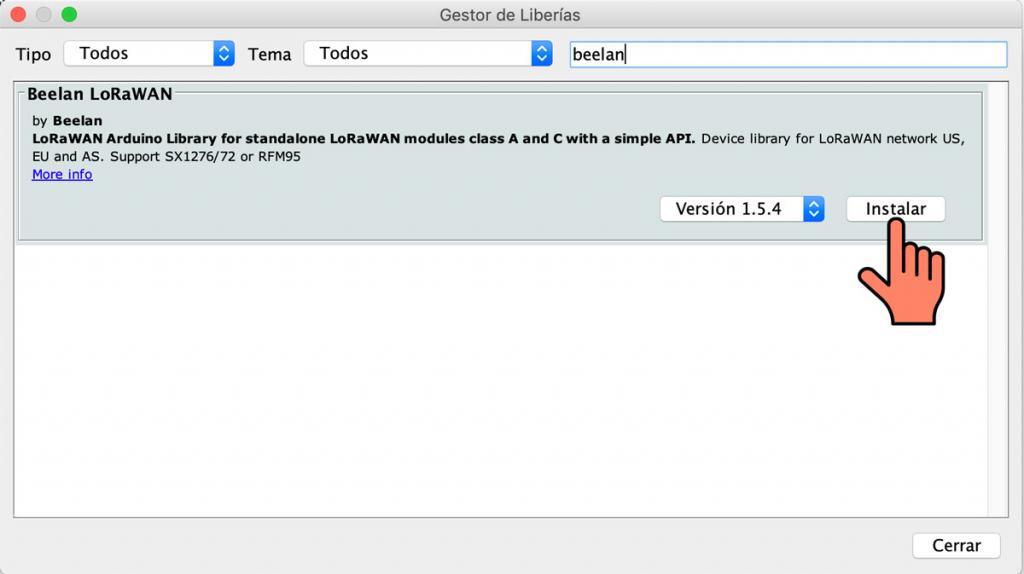
- Beelan LoRaWAN, the base library that implements LoRaWAN support for the SX127x chipset. This library can be installed in an ordinary way using the Arduino IDE library manager, and searching for it with the indicated name.
- yubox-LoRaWAN, the adapter that allows configuring the AppEUI and AppKey for LoRaWAN's OTAA support. This library implements a new menu called LoRaWAN in the YuboxNow Web interface. The version that uses the Beelan-LoRaWAN library is in the SX127x-Beelan-LoRaWAN branch, which can be downloaded as a ZIP file from https://github.com/yubox-node-org/yubox-LoRaWAN/archive/refs/heads/master.zip.
Step 4) Run sample program
The yubox-LoRaWAN library contains the yubox-lorawan-helloworld sample that shows the integration as part of a complete program.
Make sure you have selected the “Heltec WiFi LoRa 32 (V2)” board as the target from the Arduino IDE, otherwise the LoRa pin definitions will not be available and the compilation will fail.
Build the html content
For this we run the Yubox Assemble HTML Interface plugin. What this plugin does is take a template as a base, which is located in the data-template folder, and build a directory called data, which is the one that is actually transferred to the ESP32.
Compile Arduino
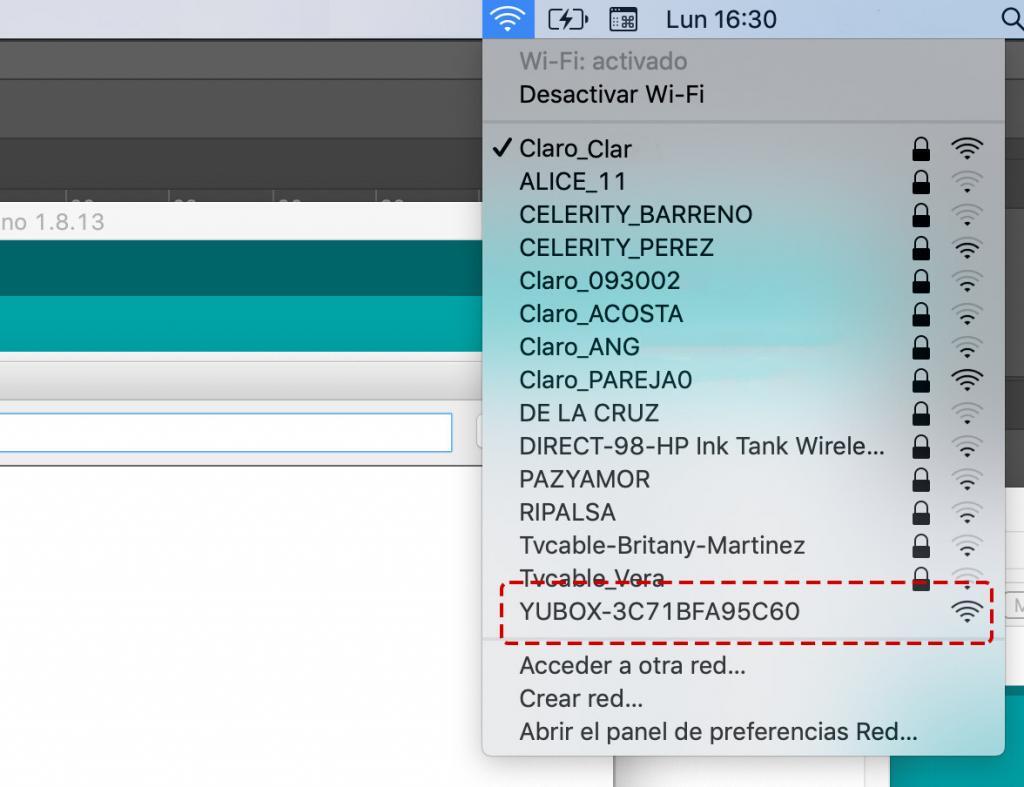
After compiling and transferring the code we should see a new network in the WiFi network menu of our computer. The name of the network begins with the word YUBOX. We connect to that network and visit the web interface at IP 192.168.4.1. Almost everything is ready!
Step 5) LoRaWAN Configuration
Now, we go to a browser, we visit the aforementioned IP and we find the YuboxNow interface. The default user is admin and the key is yubox. The first thing we must do when entering is to change the password.
We will access a responsive and slim interface from where configuring WiFi access, updating the firmware or configuring LoRaWAN will be quite simple ... yes!
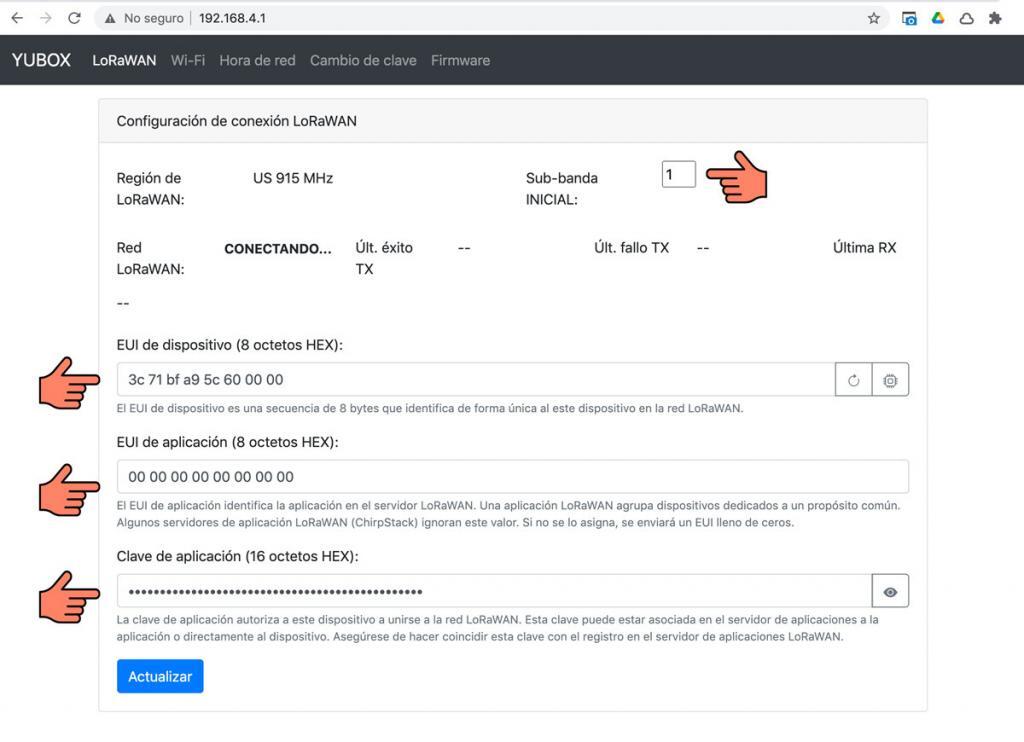
I leave my LoRaWAN configuration screen. The most important data is the EUI of the device and the application key. The application EUI can be 16 zeros as seen in the figure, unless our LoRaWAN network needs something different.
Extra) Compilation from command line, for expert users
Some expert users prefer to compile without using the Arduino IDE. That is why YuboxNow brings the ability to compile from the command line. To compile we execute the make command with the following options.
make ARDUINO_INSTALL = ~ / arduino-1.8.15 YF = ~ / Arduino / libraries / yubox-now-master ESP32_BOARD = heltec_wifi_lora_32_V2
The ARDUINO_INSTALL option should point to the directory where Arduino is installed in our system.
To transfer our sketch we execute the make command again, but with the fullupload option
make fullupload
This command assumes that our device is connected to the USB port called / dev / ttyUSB0, but the path can be changed if we add the SERIALPORT = path parameter
YuboxNow carries on the spirit of Yubox, the first Ecuadorian Linux distribution. More technology made in Ecuador.
Categories
The books · born from this blog

Atahualpa con su abrigo de pelo de murciélago
y otras 49 historias verdaderas que parecen mentira
Available on Amazon
Tocar madera
Pequeña historia de las supersticiones que el mundo no ha podido soltar
Available on Amazon
100 futuros
Cien escenarios del mundo que viene con la inteligencia artificial
Available on AmazonYou may also like

ESP32 from scratch: which board to buy and what to build
A beginner's guide to the ESP32: which board to buy for your project, how the S3, C3 and C6 models differ, and what you can actually build with each.

ESP32 vs Arduino vs Raspberry Pi Pico: which to choose
A clear comparison of the ESP32, Arduino and Raspberry Pi Pico: how they differ, which one fits your project and what each board actually costs.
Vacuum Tube vs Transistor: The Battle for Electronics
For decades the vacuum tube ruled electronics, until a tiny chip of metal dethroned it. The story of the battle that shrank technology into your pocket.