Testing WebRTC on Elastix 4 (step by step)
A hands-on, step-by-step guide to getting WebRTC working on Elastix 4, from installing the PBX to running a real softphone right inside your browser.

The term WebRTC has recently become a trend in the VoIP arena. Many do not really understand what it is and others think that it is just a softphone in the browser.
This article also does not seek to solve the mysteries of WebRTC, but rather to find an effective solution for those who wish to experiment with this technology; And yes, the idea of this article is to make a softphone work in the browser, but the possibilities from there are much more interesting.
To get straight to the dough and without further ado, let's start with the steps.
1) INSTALL ELASTIX
1.1) Download and install Elastix 4 RC3 from this link
1.2) We update Asterisk because the version that comes in Elastix 4 RC3 does not have ICE support
# rpm -Uvh http://repo.elastix.org/elastix/4/updates/x86_64/RPMS/asterisk-11.20.0-1.el7.centos.x86_64.rpm
2) INSTALL THE WEBPHONE
2.1) Download sipml5-master.zip from https://github.com/DoubangoTelecom/sipml5 and place the file on the Elastix server under the path / var / www / html
2.2) On the server we execute the following commands.
# cd / var / www / html # unzip sipml5-master.zip # mv sipml5-master phone
3) CREATE EXTENSIONS
Ingresar a Elastix y crear 2 extensiones en el menú “PBX -> PBX Configuration -> Extensions”.
I have created 2001 and 2002, taking care to set the following 4 options.
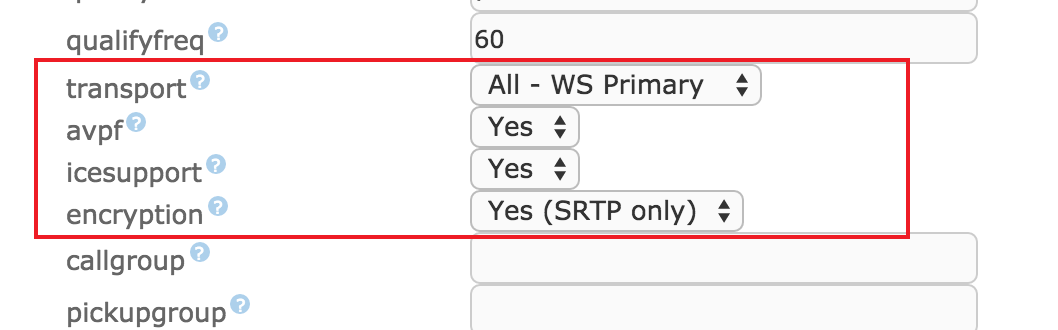
The 2001 account I will use for the WebRTC phone and the 2002 I will configure it on a desktop softphone. In this case the BRIA.
We apply the changes.
Here comes something tricky and it is that apart from these parameters it is necessary to configure others that FreePBX does not have by default, so we will be forced to put them by hand in the configuration file /etc/asterisk/sip_additional.conf
In the section corresponding to the WebRTC extension (that is, 2001 in our case) we add the following lines:
dtlsenable = yes; Tell Asterisk to enable DTLS for this peer dtlsverify = no; Tell Asterisk to not verify your DTLS certs dtlscertfile = / etc / asterisk / keys / asterisk.pem; Tell Asterisk where your DTLS cert file is dtlsprivatekey = / etc / asterisk / keys / asterisk.pem; Tell Asterisk where your DTLS private key is dtlssetup = actpass; Tell Asterisk to use actpass SDP parameter when setting up DTLS
We also modify the line that configures the transport, including WSS among the available transports. The line should look like this:
transport = wss, ws, udp, tcp, tls
[alert style = \ "green \"] Note here that these changes WILL BE OVERWRITTEN every time we apply the FreePBX configuration. In Elastix 4 stable we plan to solve this problem, as well as include the Asterisk RPM with ICE support. [/ Alert]
4) I CREATE CERTIFICATES FOR SRTP
4.1) I create the folder where the keys will go
# mkdir / etc / asterisk / keys
4.2) I create the certificates
# /usr/share/doc/asterisk-11.20.0/contrib/scripts/ast_tls_cert -C pbx.mycompany.com -O "My Super Company" -d / etc / asterisk / keys # / usr / share / doc / asterisk -11.20.0 / contrib / scripts / ast_tls_cert -m client -c /etc/asterisk/keys/ca.crt -k /etc/asterisk/keys/ca.key -C phone1.mycompany.com -O "My Super Company "-d / etc / asterisk / keys -o malcolm
4.3) Permissions
# chown -R asterisk.asterisk / etc / asterisk / keys
5) CHANGES IN ASTERISK
5.1) I create the certificates for the embedded Web server that Asterisk brings
# openssl req -new -x509 -days 365 -nodes -out /tmp/foo.pem -keyout /tmp/foo.pem
5.2) Edit the vim /etc/asterisk/http_additionals.conf file
[general] enabled = yes enablestatic = no bindaddr = 0.0.0.0 bindport = 8088 prefix = asterisk tlsenable = yes tlsbindaddr = 0.0.0.0: 8089 tlscertfile = / tmp / foo.pem tlsprivateket = / tmp / foo.pem
5.3) I edit the file /etc/asterisk/sip_general_custom.conf and add the following lines
tlsenable = yes tlsbindaddr = 0.0.0.0 tlscertfile = / etc / asterisk / keys / asterisk.pem tlscafile = / etc / asterisk / keys / ca.crt tlscipher = ALL tlsclientmethod = tlsv1
5.4) restart asterisk
# service asterisk restart
6) PHONE CONFIGURATION
6.1) WEBPHONE
Point the browser to the WebRTC client http://192.168.88.106/phone/call.htm and configure
Note: In my case this (192.168.88.106) is the IP of my Elastix server.

We press the button that says \ ”Expert mode? \” And configure the following parameters.

In the previous screen it should be noted that we are using WSS as transport, instead of WS.
6.2) BRIA
I configure another SIP client for the 2002 extension. In my case the BRIA

[alert style = \ ”green \”]
Tip importante: En caso de usar certificados no válidos (auto firmados) como en nuestro ejemplo, es necesario que el navegador acepte previamente dicho certificado. Para lograr esto, antes de usar el teléfono Web, debemos apuntar nuestro navegador al URL del websocket, aquí es https://192.168.88.106:8089/asterisk/ws. Luego de aceptar el certificado, obtendremos un mensaje de \”Upgrade Required\” que es lo esperado. A continuación, ya podremos usar el teléfono WebRTC.
[/ alert]
Categories

You may also like

What the Turing Test Is and Why It's No Longer a Challenge for Artificial Intelligence
The Turing Test was AI's holy grail for decades, but a fake Ukrainian boy and modern chatbots reveal why it stopped being a real challenge.

Predictive vs progressive vs automatic scoreboard. Call center concepts.
Predictive, progressive, or automatic dialer: understand how each call center dialing mode works and why the right one saves real money.
Interview Entrepreneurship, Innovation and Technology
I leave you my last interview talking about various topics, from entrepreneurship and innovation, to technology and artificial intelligence.